

29 February art projects for pet lovers!
February is a liar, tell me, can't you tell?
It's just March in disguise, trying to fool you well….
Don’t let this idea of a deceptive precursor to March fool you further as the month of February not just hints the transition of weather and months but it also opens up the window to your loved ones. This month that retains the chill of winter and colorful parades, highlights an important day to show your affection and love to your precious ones. And we all leave no stone unturned to showcase our heartfelt emotions towards the people we love and cherish.
So this February did you appreciate all your near and dear ones? or wait ….amidst the long list of the people you forgot someone really special. A being who is not just our friend but is the one whose presence soothes our aches and pulls us out from our daily trance. Yes, the four legged pals - our pets! Pet lovers, it’s time to show your love and affection towards your pets to the people around you. This guide will unfold 29 February art projects that will allow you to express your love to your furry friends in an artistic way.
WEEK 1 - February art projects
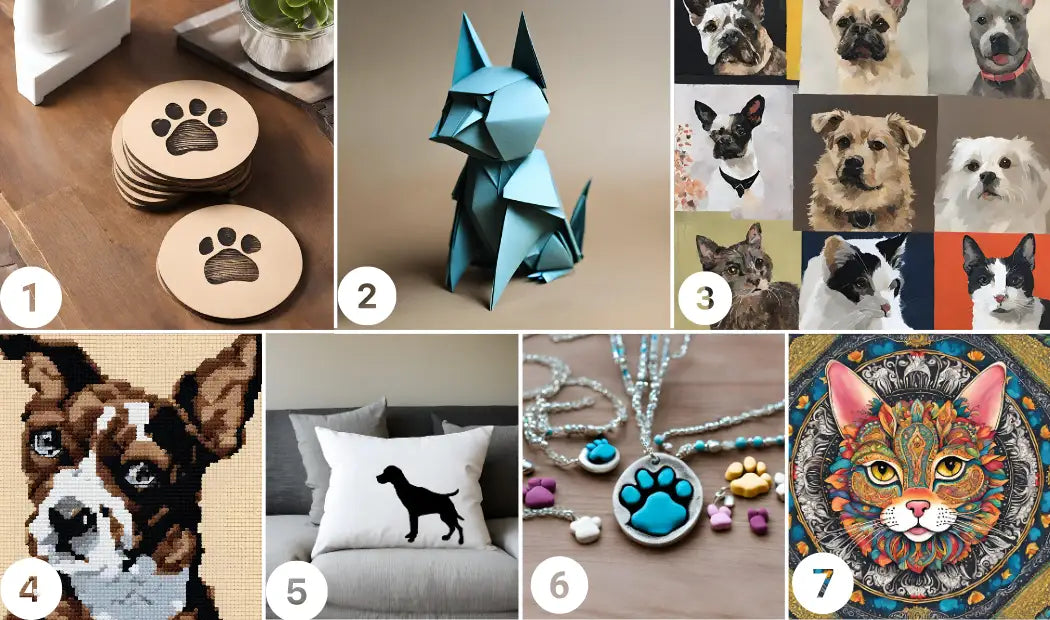
#No.1
Pet paw print coasters
Materials:
- Ceramic coasters
- Non-toxic paint
- Paintbrush
- Your pet's paw
Instructions:
- Pour a small amount of non toxic paint on a plate.
- Cover your pet paws with paint and then press their paw onto ceramic coaters and hold for a few seconds.
- Let it dry completely and apply a coat of varnish over the paw prints for durability and protection.
#No.2
Pet inspired origami
Materials:
- Origami paper
Instructions:
- Choose an origami design inspired by your pet such as a cat, dog or bird.
- Simply follow the instructions for folding the origami design using origami paper.
- Remember to be precise when folding the paper to get a neat and crisp fold.
#No.3
Pet portrait in collage
Materials:
- Magazine clippings
- Scissors
- Glue
- Canvas or heavy paper
Instructions:
- Print the pictures of your pet and carefully crop your pet from the pictures.
- Arrange the cutouts on the canvas, then use glue to paste and assemble the pictures.
- Once completed allow the glue to dry completely before displaying the collage.
#No.4
Pet cross stitch
Materials:
- Cross stitch fabric
- Embroidery floss
- Embroidery needle
Instructions:
- Choose a pet themed cross stitch pattern or find a video relevant to your design.
- Thread the embroidery needle.
- Follow the pattern instructions to create the design.
- Display or frame your pet-themed cross stitch february art projects.
#No.5
Pet silhouette pillow
Materials:
- Fabric
- Scissors
- Sewing supplies
- Pillow stuffing
- Fabric
Instructions:
- Choose a fabric and cut two same shapes of your choice.
- Cut out the pet silhouette from a different fabric or paint it.
- Place the fabric pieces together with the right sides turned inward and sew around the edges.
- Remember to leave an opening and stuff the pillow.
- Once done, hand stitch the opening and your pillow is couch ready now!
#No.6
Pet paw print jewelry
Materials:
- Polymer clay
- Earring hooks or necklace chains
- Oven
Instructions:
- Roll polymer clay on a flat sheet of paper.
- Press your pet’s paw on the clay and cut out the shape with a knife.
- Pierce a hole at the top and bake the clay.
- Once cooled, attach hooks or chains to complete the jewelry.
#No.7
Pet mandala February art projects
Materials:
- Paper
- Pencils
- Markers or colored pencils
Instructions:
- Draw a circle on the paper.
- Sketch paws, bones, or any other article related to your pet.
- Divide the circle in sections and fill it with various patterns or shapes.
- Color the patterns and shapes to give your pet themed mandala a visual appeal.
WEEK 2 - February arts and crafts
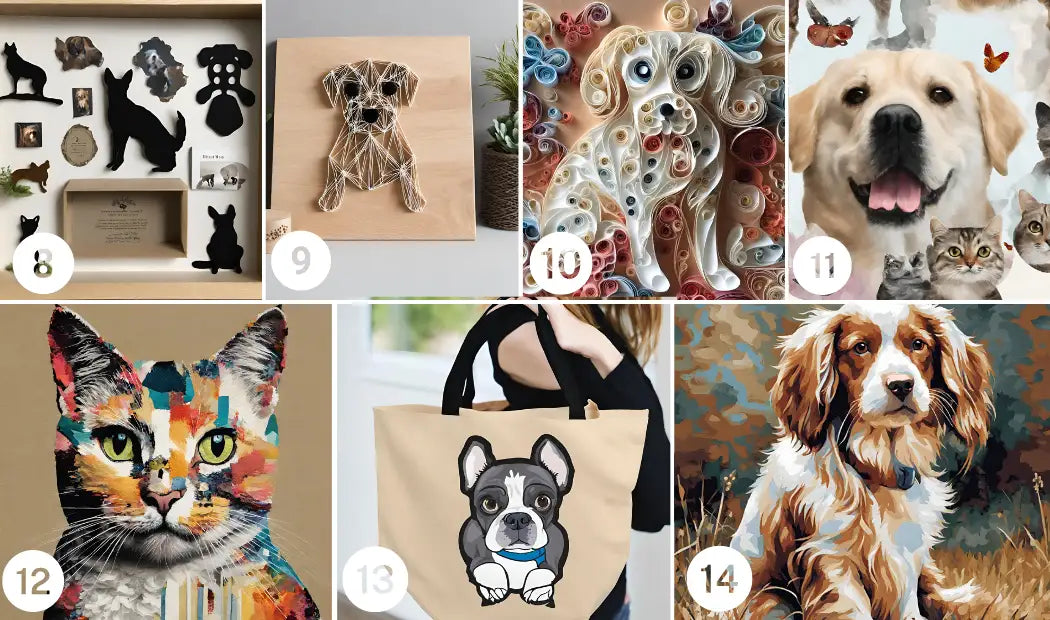
#No.8
Pet collage shadow box
Materials:
- Shadow box frame
- Photographs of your pet
- Decorative paper
- Glue
Instructions:
- Place photos of your pet in the shadow box frame.
- Once you have placed them as per to your liking, glue the photos and decorative paper in place.
- Close the shadow box frame and display your pet collage shadow box.
#No.9
Pet string art
Materials:
- Wood board
- Nails
- Hammer
- Colorful string
Instructions:
- Draw an outline of your pet on the wooden board.
- Hammer the nails on the outline.
- Wrap colorful string around the nails to fill in the shape.
- Use different colors and patterns to create a pet art uniquely yours.
#No.10
Pet paper quilling
Materials:
- Quilling paper strips
- Quilling tool
- Glue
- Paper
Instructions:
- Roll quilling paper strips into coils with a quilling tool.
- Shape the coils into paw prints. bones or pet silhouette.
- You can either create a framed artwork with it or you can create smaller motifs and use them as jewelry.
#No.11
Pet inspired digital collage
Materials:
- Computer
- Image editing software
- Printer
Instructions:
- Collect images of your pet, edit them using image editing software and applications.
- Select a layout of your pet collage.
- Add elements such as textures, patterns and quotes.
- Print your digital collage and display it as wall art.
#No.12
Pet inspired fabric collage
Materials:
- Fabric scraps
- Fabric glue
- Canvas or fabric base
Instructions:
- Cut out shapes and motifs from fabric scraps of the color of your pet.
- Arrange the pieces of fabric on the canvas so that it looks similar to your pet.
- Cut out ears and eyes and paste it on the completed pet fabric collage.
- Use glue to paste them all and let it dry completely before displaying your fabric collage.
#No.13
Customized pet tote bags
Materials:
- Plain canvas tote bags
- Fabric paint or markers
- Stencils or templates
Instructions:
- Draw the image of your pet on the tote bag, you can either freehand the design or use stencils.
- After the image is ready, paint your pet’s image.
- Then let the paint dry completely before using it.
#No.14
Pet paint by numbers
Materials:
- Pet paint by numbers kit
Instructions:
- A pet paint by numbers kit has everything one needs to begin their painting journey.
- Follow the instructions given in the kit and prepare your painting materials.
- Use paintbrushes and paint the numbered sections on the numbered canvas.
- Once completed, let the pet february paintings dry then display the february art projects.
WEEK 3 - February art projects
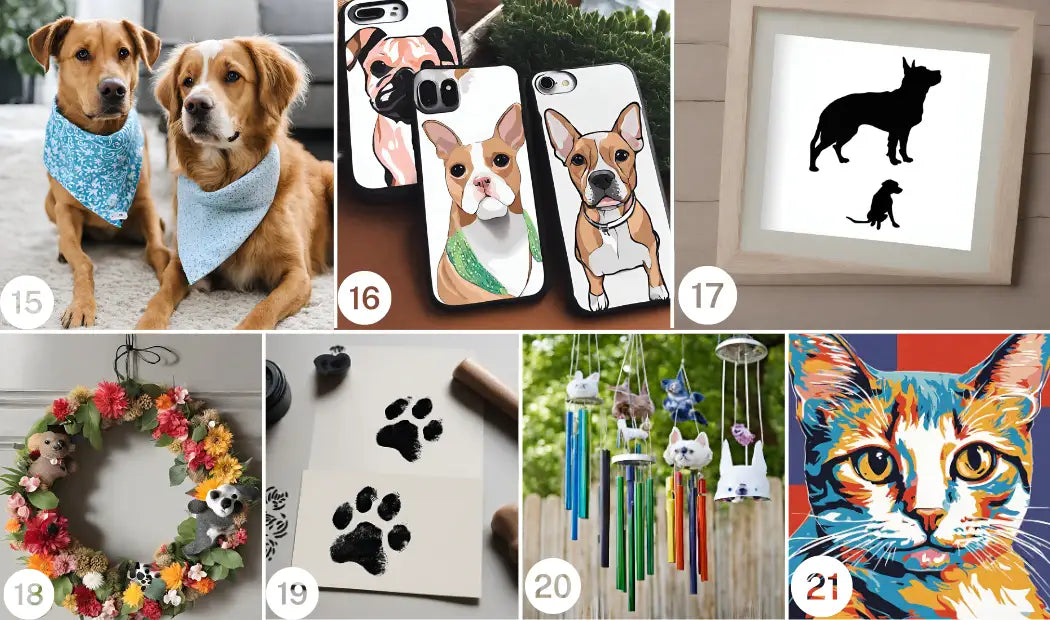
#No.15
DIY pet bandanas
Materials:
- Fabric in various patterns and colors
- Scissors
- Sewing machine or needle and thread
- Iron-on patches or fabric paint
Instructions:
- Measure and cut a triangular shape from fabric according to the size of your pet’s neck.
- Fold the hem and sew the edges of the dog bandana.
- You can paint the motifs related to your pet on the bandana.
- Once the paint is dry, your DIY dog bandana is ready.
#No.16
Custom pet phone cases
Materials:
- Clear phone case
- Pet-themed stickers
- Clear adhesive
Instructions:
- Clean the surface of your clear phone case.
- Paste pet themed stickers on the inside of the phone case.
- Apply a layer of clear adhesive on the stickers to paste them in place.
- Let the adhesive dry completely.
#No.17
Pet silhouette art
Materials:
- Black paper
- Scissors or precision knife
- White pencil or chalk
- Frame
Instructions:
- Take a photo of your pet’s profile and print it (you can also draw the silhouette).
- Place the printed photo and trace it on a black sheet, then outline the shape on the sheet.
- Carefully cut the silhouette, take a colorful contrasting sheet.
- Paste the silhouette on the sheet with glue.
- Frame your february art projects and display it.
#No.18
DIY pet wreaths
Materials:
- Wreath base (e.g., foam, grapevine)
- Artificial flowers, leaves, and other decorative elements
- Hot glue gun and glue sticks
- Ribbon or bow
Instructions:
- Prepare the base with foam.
- Attach artificial flowers, leaves and other decorative elements with a glue gun.
- Attach paw prints or small toys on the wreath.
- Add a bow on the top.
- Hang your pet themed wreath on the door.
#No.19
Pet ink stamp art
Materials:
- Ink pads in various colors
- Pet’s paw
- Paper or cardstock
Instructions:
- Apply ink on your pet’s paw.
- Then stamp your pet’s paw on the sheet of paper.
- Let the ink dry and frame your pet’s paw print.
#No.20
DIY pet wind chimes
Materials:
- Assorted metal or wooden beads
- Small bells
- Nylon thread or fishing line
- Metal or wooden ring
- Pet photos
- Cardboard
Instructions:
- Thread beads and bells on a nylon thread or fishing line.
- Tie the threads on the wooden ring, make sure they have equal space between them.
- Paste the pet photos on cardboard, cut out your pet’s image.
- Attach the photo cutouts on the thread.
- Hang your DIY pet wind chime in a spot where they can catch both wind and sunshine.
#No.21
Pet pop art by numbers
Materials:
- Pet pop art paint by number kit
Instructions:
- Follow the instructions given in your pet pop art by number kit.
- Use the given paint brushes to paint the sections on the canvas of pet themed february painting.
- Once completed, dry the paint and your pop art masterpiece is ready to be displayed.
WEEK 4 - February art projects
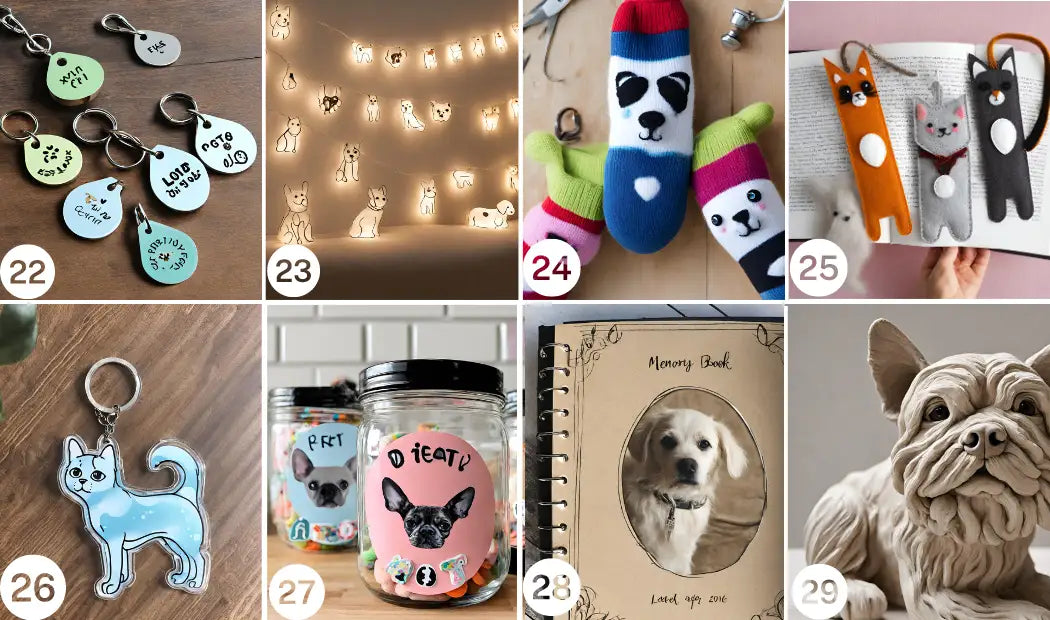
#No.22
DIY pet tags
Materials:
- Metal pet tags
- Alphabet stickers or marker
- Hammer (optional)
- Protective coating spray (optional)
Instructions:
- Place the metal tag on a flat surface.
- Write your pet’s name using alphabet stickers or permanent markers.
- Use a hammer to gently tap over the stickers.
- You can spray a protective coating over the tag.
- Attach the pet tag to the pet collar.
#No.23
Pet string lights
Materials:
- String lights
- Pet-themed decorations (mini pet figurines, paw print stickers, or pet-themed charms)
- Glue or adhesive
Instructions:
- Attach pet themed decorations to the string lights using glue.
- Make sure the decorations look visually appealing along the string lights.
- Let the glue dry before plugging in the string lights.
- Display the pet themed string lights in your home.
#No.24
DIY pet sock toys
Materials:
- Clean socks (unused)
- Pet-safe stuffing material (such as polyester fiberfill)
- Squeakers or crinkle material
- Needle and thread
- Pet-safe markers or fabric paint
Instructions:
- Fill the sock with pet safe stuffing materials, ensure it is not too tightly packed.
- You can add squeakers to the socks.
- Use a threaded needle to sew the opening.
- Draw pet related designs on the pet themed sock toy with markers or fabric paint.
- Present the sock toy to your furry friend.
#No.25
Pet felt bookmarks
Materials:
- Felt fabric in various colors
- Scissors
- Fabric glue
- Ribbon
- Pet-themed embellishments (felt shapes or miniature toys)
Instructions:
- Decide a shape and size of your pet themed bookmark.
- Cut a piece of felt of a size of your choice.
- Paste cutouts of paw prints, bones or anything relevant to your pet.
- Paste the decoration with fabric glue.
- Cut the length of ribbon and attach it to the bookmark.
#No.26
Pet acrylic keychains
Materials:
- Acrylic keychain blanks
- Pet-themed stickers or decals
- Mod Podge or clear adhesive
- Keychain rings
Instructions:
- Paste the pet sticker or a small pet photo on an acrylic keychain blank.
- Apply clear adhesive on the acrylic keychain.
- Let the adhesive dry completely before attaching the keychain ring.
- Attach your keys to the pet themed keychain.
#No.27
DIY pet treat jars
Materials:
- Glass or plastic jars with lids
- Pet-themed stickers or decals
- Paint pens or permanent markers
- Pet treats
Instructions:
- Clean and dry the jars.
- Decorate the jars with pet stickers or pictures. You can also draw pet images with paint pens or permanent markers.
- Allow the paint or markers to dry.
#No.28
Pet memory book
Materials:
- Scrapbook or blank journal
- Photographs of your pet
- Decorative elements (such as stickers, washi tape, and markers)
- Written memories or anecdotes about your pet
Instructions:
- Gather photographs and anecdotes about your pet.
- Arrange them in the scrapbook or blank journal.
- Take your time to decorate each page of your journal.
#No.29
Pet clay sculptures
Materials:
- Air dry clay
- Sculpting tools
- Acrylic paints
- Paintbrushes
- Clear sealant (optional)
- Reference images of pets for inspiration
Instructions:
- Knead the clay until it is soft.
- Find an image or video of a pet clay sculpture that is similar to your pet.
- Use your hand and tools to shape the clay into the shape of a pet.
- Take your time and add the intricate details.
February art activities: Wrap-Up!
As we sign off this blog series, let's carry forward the spirit of creativity, compassion, and companionship that defines our relationship with our pets. Let's make every day an opportunity to express gratitude for the unconditional love they give so freely. Their presence in our lives is truly profound as they inspire us to see the world through their eyes and infuse each moment with boundless wonder.
Thank you for journeying with Pets by Numbers on this artistic adventure, may your hearts be forever filled with the warmth and affection of your beloved pets. Until next time, keep creating, keep loving, and continue embracing the magic of life with your furry friends by your side - here's to many more years of paw-some adventures together!
